TOCON

Introduction
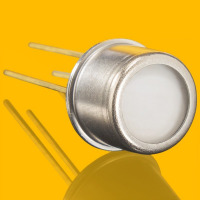
The word TOCON is a made-up word formed from the terms "TO housing" and "converter". At sglux it refers to the combination of a photodiode and an amplifier, more precisely a transimpedance amplifier. Both components are integrated in a hermetically sealed TO housing.
In addition further optical components such as lenses, filters, attenuators and diffusers are built into the cap of the TO housing. This results in an extraordinary variety of TOCONs covering different spectral ranges and a very wide sensitivity range.
A TOCON is therefore a highly specialised optical sensor that provides an easy-to-use voltage signal. In contrast to the direct use of photodiodes the user is not confronted with the often extremely small photocurrent signals and their amplification, which can help to overcome several difficulties.
The output voltage is proportional to the incident irradiance. Like any amplifier, the one in the TOCON also has a limited bandwidth - the previous statement therefore refers to slowly changing signals and signals with low frequencies.
Right now there are 3 major TOCON families in production:
- The "standard" TOCON series for general use with a vast number of sub-families for several spectral ranges and the widest irradiation range on market
- TOCON_N family for highest precision at smallest signal levels, for higher speed and high temperature operation
- TOCON_F series optimized for flame detection of hydrocarbons and hydrogen
Overview of standard TOCON variants
The following Table gives a rough overview about our standard TOCON families
| TOCON Family |
Spectral Category |
Spectral Sensitivity Range in nm |
Wavelength of Peak Sensitivity in nm |
Measurement Ranges in W/cm² |
|---|---|---|---|---|
| TOCON_ABC | UV-Broadband | 227 to 360 | 290 | 18 nW to 18 W |
| TOCON_A | UVA | 309 to 367 | 331 | 18 µW to 1 W |
| TOCON_B | UVB | 243 to 303 | 280 | 7.5 µW to 750 µW |
| TOCON_C | UVC | 225 to 287 | 275 | 180 nW to 1.8 W |
| TOCON_E | Erythem | 280 to 400 | 280 | 7.5 µW to 75 µW |
| TOCON_BLUE | Blue light | 390 to 515 | 445 | 9 µW to 900 mW |
| TOCON_GaP | UV + VIS | 240 to 560 | 445 | 9 µW to 900 mW |
Please refer to the TOCON Selection Guide to determine the most suitable TOCON for your application.
The TOCON_N family uses a split power supply but is otherwise comparable to a standard TOCON.
The TOCON_F series has a linear-logarithmic transfer function but also uses a single power supply.
Using TOCONs with microcontrollers
How to use TOCONs with microcontrollers in general
The voltage output of a TOCON can be connected directly to analogue inputs of almost any microcontroller. Due to their low power consumption of typically 35...150µA and their supply voltage range of 2.3...5V they can be powered from the microcontroller's supply or even directly from a GPIO pin.
The following list shows just a few widely known microcontroller development boards that have been used successfully:
- Arduino Uno / Nano / Micro (ATmega328)
- Arduino Mega (ATmega2560)
- Adafruit Feather M0 (ATSAMD21)
- ESP8266 and ESP32 based modules such as ESP32-DEVKITC-32U(E) or NODEMCU
If the resolution or accuracy of the MCU's internal AD converter is not sufficient, many different external AD converters can of course be used, for example:
- Texas Instruments ADS101x (12-Bit, I2C) / ADS1115 (16-Bit, I2C)
- Microchip MCP342x (16-Bit, I2C), MCP355x & MCP356x (24-Bit, SPI)
- Analog Devices LTC2400 (24-Bit, SPI)
Basically any voltage input ADC can be used. An stable reference supply (also internally) and a standard compatible interface such as I2C or SPI is recommended. Both single-ended inputs as well as differential inputs can be used. Differential inputs do not provide any added benefit in many applications though.
Use of a TOCON with an Arduino (internal ADC)
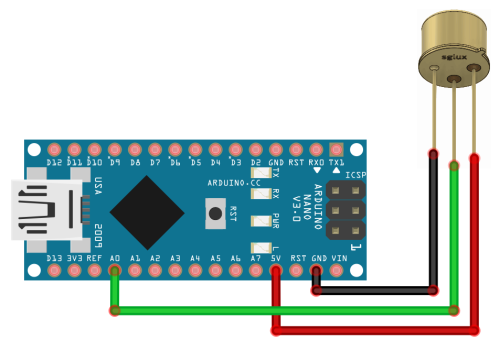
In this example we power the TOCON from the 5 Volt supply rail. The internal ADC is set for VCC as reference, hence the input voltage range is also 0...5 volts (identical to TOCON output voltage range).
Wiring instruction for Arduino Nano
Incorrect wiring can damage the TOCON and/or the microcontroller!

Code
For programming our Arduino, we'll need the Arduino IDE
It can be downloaded from the site
The following script for the Arduino reads analogue values from A0
int analogPin = A0;
int val = 0; // variable to store the value read

void setup() {
  Serial.begin(9600);           // configure the serial interface
  analogReference(DEFAULT);     // set the analog reference to the supply voltage
}

void loop() {
  val = analogRead(analogPin);  // read the analog input value from pin A0
  Serial.println(val);          // print the read value
}
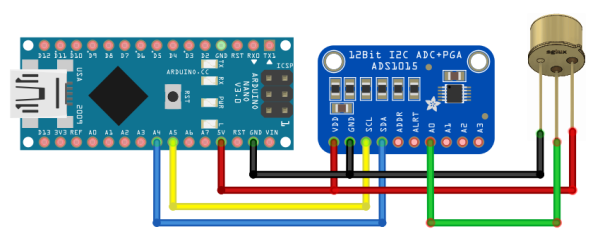
Using an external ADC to improve resolution and reduce noise
Schematic for an Arduino Nano

Code
Besides using the external ADC to improve the precision of the measurement we also demonstrate the calculation of the radiation intensity from the measured voltage.
For this we nee the "Typical Responsivity" value from the Datasheet of the TOCON in use.
In our example we use a TOCON_ABC1 whose datasheet can be found hereDatasheet_ABC1

#include <Adafruit_ADS1X15.h>
Adafruit_ADS1115 ads;  /* Use this for the 16-bit version */

void setup(void)
{
  Serial.begin(9600);
  //Serial.println("Hello!");

  Serial.println("Getting single-ended readings for AIN0");
  Serial.println("ADC Range: +/- 6.144V (1 bit = 3mV/ADS1015, 0.1875mV/ADS1115)");
  Serial.println("-------------------------------------------------------------");

  // The ADC input range (or gain) can be changed via the following
  // functions, but be careful never to exceed VDD +0.3V max, or to
  // exceed the upper and lower limits if you adjust the input range!
  // Setting these values incorrectly may destroy your ADC!
  //                                                                ADS1015  ADS1115
  //                                                                -------  -------
  // ads.setGain(GAIN_TWOTHIRDS);  // 2/3x gain +/- 6.144V  1 bit = 3mV      0.1875mV (default)
  // ads.setGain(GAIN_ONE);        // 1x gain   +/- 4.096V  1 bit = 2mV      0.125mV
  // ads.setGain(GAIN_TWO);        // 2x gain   +/- 2.048V  1 bit = 1mV      0.0625mV
  // ads.setGain(GAIN_FOUR);       // 4x gain   +/- 1.024V  1 bit = 0.5mV    0.03125mV
  // ads.setGain(GAIN_EIGHT);      // 8x gain   +/- 0.512V  1 bit = 0.25mV   0.015625mV
  // ads.setGain(GAIN_SIXTEEN);    // 16x gain  +/- 0.256V  1 bit = 0.125mV  0.0078125mV

  if (!ads.begin()) {
    Serial.println("Failed to initialize ADS.");
    while (1);
  }
}

void loop(void)
{
  char buffer[40];
  int16_t adc0;
  float mvolts0;
  float radiation0;
  // Pick the "Typical Responsivity" of your TOCON from the Datasheet
  // In our example we use a TOCON_ABC1
  // http://download.sglux.de/tocons/TOCON_ABC1.pdf
  const float typResponse = 280; // mV/nW/cm2

  adc0 = ads.readADC_SingleEnded(0); // Read value from ADC

  mvolts0 = ads.computeVolts(adc0) * 1000; //mV
  radiation0 = mvolts0 / typResponse; // nW/cm2

  sprintf(buffer, "ADC0: %5i | ", adc0); // format int
  Serial.print(buffer);

  dtostrf(mvolts0, 6, 1, buffer); // format float
  Serial.print(buffer);
  Serial.print(" mV | ");

  dtostrf(radiation0, 6, 2, buffer); // format float
  Serial.print(buffer);
  Serial.println(" nW/cm2");

 delay(1000);
}
Multiple TOCONs at once
Of course you can connect multiple TOCON to one microcontroller. Just connect them to A1,A2,A3 ect. and expand your code accordingly.
Number of channels:
- ATmega328: 8
- ATmega2560: 16
- ATSAMD21: 14
- ADS1x15: 4 ... 16 ... 128
- You can setup the ADS1x15 with one of four addresses, so you can place 4 ADS1x15 chips on a single I2C bus
- Using 1-to-8 of TCA9548A I2C Multiplexer you can use up to 128 channels
Troubleshooting
| Problem | Solution |
|---|---|
| Radiation on the input, but no voltage on the TOCON output pin | - Check correct wiring and magnitude of the supply voltage - Check if you really have the correct light source and intensity matching with the spectral response and sensitivity of the TOCON. |
| Output voltage is noisy | - Did you place a supply blocking capacitor near the TOCON? Do so! - Are there long wires between the TOCON and your ADC? Avoid this! You could use a low-pass filter on TOCON signal placed near the reading device, for instance 1kOhm/1µF to suppress noise. |
| Output voltage is too small | Consider using a TOCON with a higher sensitivity or change your setup to get more light on the input window. |
| Output voltage is too high | If the output voltage is as large as the supply voltage you have too much light on the TOCON. Either attenuate the light, increase the distance to the light source or consider a TOCON with a lower sensitivity. |